
How to manage deposits
Use this guide to configure deposit requirements, collect payments from clients, and handle deposits when bookings are cancelled or rescheduled.
For a high-level explanation of how deposits work, see About Deposits.
Before you begin
Make sure:
- You have Admin or Manager access to change global settings.
- Your Payment Account (Stripe) is verified and ready to receive funds.
- You have decided on your standard deposit amount per location.
Step 1 — Configure Deposit Requirements
You can set deposit rules at three different levels.
Location Level (Default)
- Go to Settings > Locations and select your site.
- Open the Booking Settings tab.
- Toggle on Booking deposit required.
- Enter the default Deposit Amount and select the Deposit Expiry Period.
- Click Save Changes.
Service Level (Override)
To customise deposit requirements for specific treatments:
- Go to Settings > Services and edit a service.
- In the Service Settings tab, toggle Deposit Required on or off as needed.
- Click Save Changes.
Staff Level (Exemptions)
To customise or exclude deposit requirements for a specific practitioner:
- Go to Settings > My Team and edit the staff member.
- Select Next to go to page 2.
- Tick Exclude Deposit Required to exempt the staff member from deposit requirements, or update their Deposit Amount if they need a staff-specific deposit amount.
- Click Save.
Step 2 — Collect a deposit from the Calendar
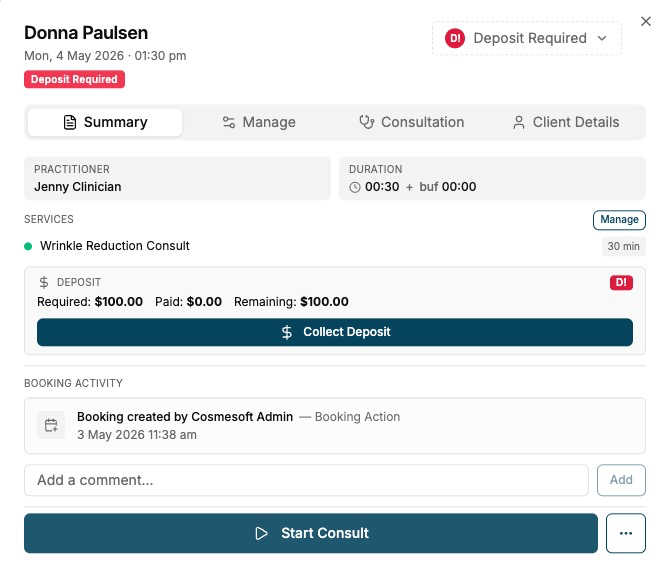
When an appointment requires a deposit, a red D! badge appears on the tile.
- Click on the appointment tile in the Calendar.
- In the Event Summary, locate the Deposit section.
- Click Collect Deposit.
- Select the Payment Method (e.g., Card, Cash, or 2Pay).
- Click Collect Deposit to finalise.
- Observe that the calendar badge turns blue and displays as D.
Step 3 — Apply the deposit at checkout
- Click the appointment and select Checkout (or find the client in the POS queue).
- The paid deposit amount will automatically appear as a deduction in the Payment Summary.
- Collect any remaining balance as per the standard checkout process.
Step 4 — Handle a deposit when a booking is cancelled
When you cancel a booking that has a held deposit, the system will prompt you to choose how to resolve it.
Option A — Release to restricted deposit credit (default)
This is the standard action available to all staff. The released amount is held as restricted deposit credit, not general spendable account balance.
- Cancel the booking from the Calendar or Appointment screen.
- The system will present Release to client credit as the default action.
- Confirm the cancellation.
- The deposit amount is released as restricted deposit credit on the client account. It remains reserved for a future booking deposit and is not available as general account balance or for normal checkout spend.
- When the client makes an eligible future booking, the restricted deposit credit can be applied to that booking’s deposit requirement.
Option B — Refund to original payment method (Admin / Manager only)
Use this option only when the business decides the client should receive their money back to their card or original payment method.
- Cancel the booking from the Calendar or Appointment screen.
- Select Refund to original payment method (this option is only visible to Admin and Manager users).
- Enter a reason for the refund (required — e.g., "Client within cooling-off period" or "Clinic cancelled appointment").
- Review the confirmation summary showing the amount and destination.
- Click Confirm to process the refund via Stripe.
Note: If the refund fails, such as due to a payment gateway error, the deposit will remain held. You will be prompted to retry the refund or fall back to releasing the deposit as restricted deposit credit instead. Deposits paid via 2Pay may not be eligible for the original-method refund option.
When you cancel a booking that has a held deposit, the system will prompt you to choose how to resolve it.
Step 5 — Handle a deposit when a booking is rescheduled
When a client reschedules their appointment, the deposit transfers to the new booking automatically. No manual action is required.
- Reschedule the booking to a new date or time as usual.
- The deposit remains linked and the D badge will appear on the new appointment tile.