
Client Treatment Notes
Writing Treatment Notes Made Easy
The Consultation section of Cosmesoft is where operators record detailed clinical treatment notes. This includes documenting the sites of injections or treatments, as well as any relevant clinical notes that may impact client care or future visits. Products used are recorded. Compliance assured!
Layout
Layout of the Treatment Screen
The Treatment Screen Layout is carefully designed to provide a clear and efficient interface for documenting treatments. Below is a breakdown of the key elements that organise the screen:
1. Top Right Corner
Supervisor (Prescriber): If the operator is a nurse requiring a supervising prescriber, the Supervisor (Prescriber) field will display the assigned prescriber’s name. You can click Change to assign a different supervisor if needed.
Supervisor's Phone Number: If enabled, clicking on the prescriber’s phone number will initiate a Facetime call. This feature is useful for quick consultations or approval during treatments.
2. Top Panel
Product Numbers in Circles: Across the top, you’ll see numbers in circles. These will be used to represent the quantity of the chosen products used during the treatment, which will be mapped to the treatment template. It’s important to place these numbers correctly, as they’ll impact inventory and billing.
Be sure to verify the exact product name, as some—such as dermal fillers—are displayed in smaller measurement units (e.g., Juvederm Ultra 0.1 ml). To record a total treatment amount of 1 ml, you would enter the number 10 (or smaller numbers that add up to 10) on the treatment note. This ensures precise documentation when products are used in fractional amounts.
3. Default Template & Template Selection
Default Template: When you first access the treatment screen, the default face template will appear, providing a baseline for facial treatments. An alternative template can be chosen in the Template section of the Consult menu.
4. Consult Menu (Left-Hand Sidebar) - see below for more detail on each section.
The Consult Menu is located on the left side of the screen, providing quick access to the essential tools and options for documenting treatments.
Navigating the Menu: Each section in the dropdown must be accessed and closed separately using the arrows on the right side to ensure that all information fits within the treatment note page:
The Consult menu contains six sections:
Drawing Tools: These tools are used for illustrating the treatment area on the template, including freehand drawing and predefined injection patterns.
Products: Here, you can select the products used for the treatment, such as injectables (Botox, Dysport) and dermal fillers. Products are linked to the numbers in circles at the top, and their placement affects stock levels and POS calculations.
Template: This section contains 8 pre-loaded templates of different treatment areas (both female and male) for illustrating the treatment area. There is also an option to upload a photo to use as your treatment note template.
Notes: This is where you’ll record clinical notes for the treatment, including details such as batch numbers, expiry dates, adverse reactions, and patient tolerance. This section contains commonly used treatment note templates. You can also add more treatment note Templates by selecting from the far left menu Admin > Consult Notes.
Billing Instructions: This section allows the operator to provide any specific billing instructions they want recorded or communicated with the reception team.
Rebooking Instructions: Here, you can trigger a reminder to Review and Rebook in a prescribed amount of weeks. This will appear as a pop-up for the receptionist once the sale has been processed.
The Consult Menu in More Detail
The order of the below information reflects the order in which the sections should be used, not how they are listed.
1. Template Selection
Before you start your treatment note, ensure the correct Template has been selected.
Drop down the Template section from the consult menu.
The Template feature allows you to select the most appropriate visual reference for your treatment area. The default template is a female facial template. There are eight alternative templates to choose from, including, a male face, backs of hands, neck and décolletage. A photo of the patient can also be uploaded.
- Using A Default Template: Select the default template to load it onto the treatment page. Note that any illustrations already completed on the current template will dissappear.
- Uploading a Photo as a Template:
- Live Photo: If using an iPad or phone, the Live Photo feature enables you to take a real-time image. Ensure you have gained written consent from the patient before using this option.
- Desktop Photo: On desktop, you’ll need to select a photo file from the computer for the template.
Once the template is chosen, confirm that you want to replace the default template when prompted.
2. Products
Drop Down the Products Dropdown to reveal a list of available treatments and products.
Choose the Product: Scroll through the list and click on the product you wish to use (e.g., Botox, Dysport). If the product is not listed, the administrator needs to add the Product to the Operator's available list.
The product’s details, including dosage units and predefined patterns (if available), will appear on the right side of the screen, ready for placement on the treatment template.
When documenting a treatment, selecting the right product is crucial, as this will deduct from the stockpile and appear for sale at the POS. If you frequently use certain items, you can mark them as Favourites by selecting the love heart beside them. This will make them appear at the top of the list at future visits.
See the Note! in the next section about the pre-loaded pattern templates that can be used for Anti-Wrinkle Injections.
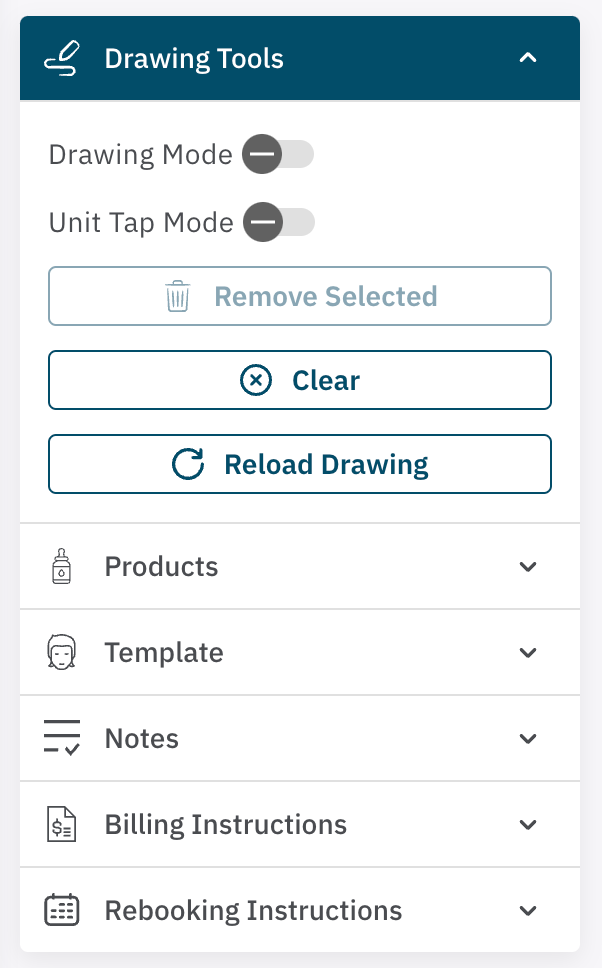
3. Drawing Tools
Once you have selected a Product, drop down the Drawing Tools menu. You have two primary methods for illustrating the placement of this product: Drag and Drop or Unit Tap Mode.
Drawing Mode can also be used, but will not record the usage of the chosen Product.
1. Drag and Drop
- Ensure that Drawing Mode and Tap Mode are both switched off.
- Select the relevant number from the top panel.
- Drag the number to the treatment area on the template/.
- Drop the number by releasing the cursor or finger.
- Fine-tune Placement: After dropping the unit, you can drag individual units to adjust their placement. If there are multiple numbers that need adjusting, select a corner above or below the units to highlight them, and then drag the group to the desired area.
- Note! Botox and Dysport both have pre-loaded templates that can be dragged and dropped on the template. When they are chosen as a Product, these templates will appear in Products. Drag and Drop the entire pattern to the face. Adjust individual or groups of units once in place.
2. Unit Tap Mode
- Enable Unit Tap Mode by toggling the button beside it until a Tick appears.
- In Unit Tap Mode, you can tap directly on the treatment area to drop units (ideal for treatments like Botox on the forehead, where there are multiple points). Make sure you have the correct number chosen first. If you make any mistakes, select the unit/s and select Remove Selected.
- Note! Remember to turn off Unit Tap Mode when done to prevent accidental additions of units.
3. Drawing Mode
- Enable Drawing Mode by tapping the button beside it.
- Use this mode to draw freehand areas of treatment on the template, helpful for irregular areas or non-injection treatments (e.g., PRP or dermal fillers).
- Repositioning and Removing Illustrations: If you wish to adjust or remove any numbers or drawings, first ensure that Drawing Mode is turned off. Then, select on the units or drawings to move them or select Remove Selected to delete them.
- Resetting the Drawing: If necessary, click Clear or Reload Drawing to reset the illustration and start over. A confirmation pop-up will appear to ensure you intend to clear the drawing.
Hints on Recording Specific Treatments
Anti-Wrinkle Injections
When documenting Botox or Dysport treatments:

- Select Botox or Dysport from the product list.
- Utilise the pre-determined injection patterns.
- Adjust individual units as needed by selecting and repositioning them.
- Add additional units if more product is required by dragging extra circles from the right-hand panel.
- Remove units if you need to correct placement by highlighting the circles and selecting Remove Selected.
Dermal Fillers
For Dermal Fillers (e.g, Juvederm, Restylane):
- Select the appropriate dermal filler from the product list.
- Units are measured in multiples of 0.1ml. For example:
- 1 = 0.1ml
- 5 = 0.5ml
- 10 = 1ml
- Drag and drop the appropriate numbers to the treatment area, adjusting placement as needed.
- You can also use Drawing Mode to add additional details to the treatment area.
Other Treatments (e.g., PRP, Peels)
For treatments that do not involve injectables:
- Select the relevant treatment (e.g., BetaPeel, PRP) from the product list.
- Illustrate the treatment area using the Draw Function.
- Record the quantity used by selecting the correct number of treatments from the right-hand panel (e.g., 1 = 1 treatment).
- Use the Drawing Function to map out the areas treated.
Recording Notes

Drop down the Notes tab to record mandatory treatment notes.
Include here information such as:
- Batch numbers and expiry dates of products.
- Adverse reactions or any changes in client condition.
- Tolerance to treatment and any other relevant observations.
- Manual Entry: Click inside the Notes box to activate the keyboard and begin typing.
- Add Prewritten Phrases: You can use the dropdown to insert prewritten phrases into the notes section. Select the tickbox beside all phrases you wish to add and click DONE. They will populate in the Notes box and can be editted as required. Pay attention that some of these notes require editing. Eg. [Minimal/moderate] bleeding during procedure. Pressure applied to resolve successfully. You should delete the amount of bleeding not required.
- Phrases can be added to this list from the far left menu, Admin > Consult Notes (with the required permissions).
Billing and Rebooking Instructions
After recording the treatment details, use the Billing Instructions and Rebooking Instructions dropdowns to provide additional guidance regarding client follow-up or billing details. These options help ensure that clients are billed accurately and rebooked according to the treatment protocol.
Review and Submit the Treatment Note
Once you've completed the treatment note, including the illustration and any relevant clinical notes, it's time to review and submit the documentation. This ensures that everything is accurate before finalizing the record.
1. Accessing the Review and Submit Screen
Once you’ve finished entering all details Click "Review and Submit" At the bottom-right corner of the Treatment Screen.
2. Review the Treatment Note
The screen will display the completed treatment note which will be stored in the history, including:
- Illustration: The image or template that includes the product placements, treatment areas, and dosage information.
- Treatment Notes: Any clinical notes you’ve added, including batch numbers, expiry dates, adverse reactions, or patient tolerance.
- Product Details: A summary of the products used, including the amount of each product applied (e.g., units of Botox, ml of dermal filler) and any relevant calculations.
- Patient Information: Basic patient details, such as name and treatment date, to ensure the note is associated with the correct client.
Take a moment to thoroughly review this information and ensure that all details are correct, including the treatment areas, product quantities, and any notes or instructions.
3. Finalising the Treatment Note
Once you’ve reviewed the treatment note, you have the following options:
Submit: If everything looks correct, click Submit to finalise the treatment note. Important: Once submitted, the treatment note cannot be edited, so ensure all details are accurate before submitting.
Save: If you’re not quite finished and need to complete the note later, you can click Save. This will save the current progress and allow you to come back and finish the note at a later time.
Back to Treatment: If you notice an error or need to make changes, click Back to Treatment. This will bring you back to the treatment screen, where you can edit the note and make any necessary adjustments before reviewing and submitting again.