
Rostering Team Members
Rosters play a key role in managing staff availability for appointments. They can also be used to schedule administrative staff and resources. It's important to keep the roster up to date to ensure smooth business operations.
Permissions Required
To set up and manage Rosters, the following permissions are required:
- View/Add/Edit/Delete All Roster Types.
(Default settings for Managers and Admins only.)
*Roster permissions are being changed... to be updated
- Self-rostering is a popular choice for clinic practitioners. Managers or Admins will need to adjust permissions to allow access to this function.
Before rostering team members, please review the previous section on Roster Setup
Managing Team Rosters
To roster a team member, you can access the roster from one of two locations:
- Admin | Rosters (Best for viewing all rosters at once with filtering options)
- My Team Select Location from Team Member's Actions Menu and then Roster
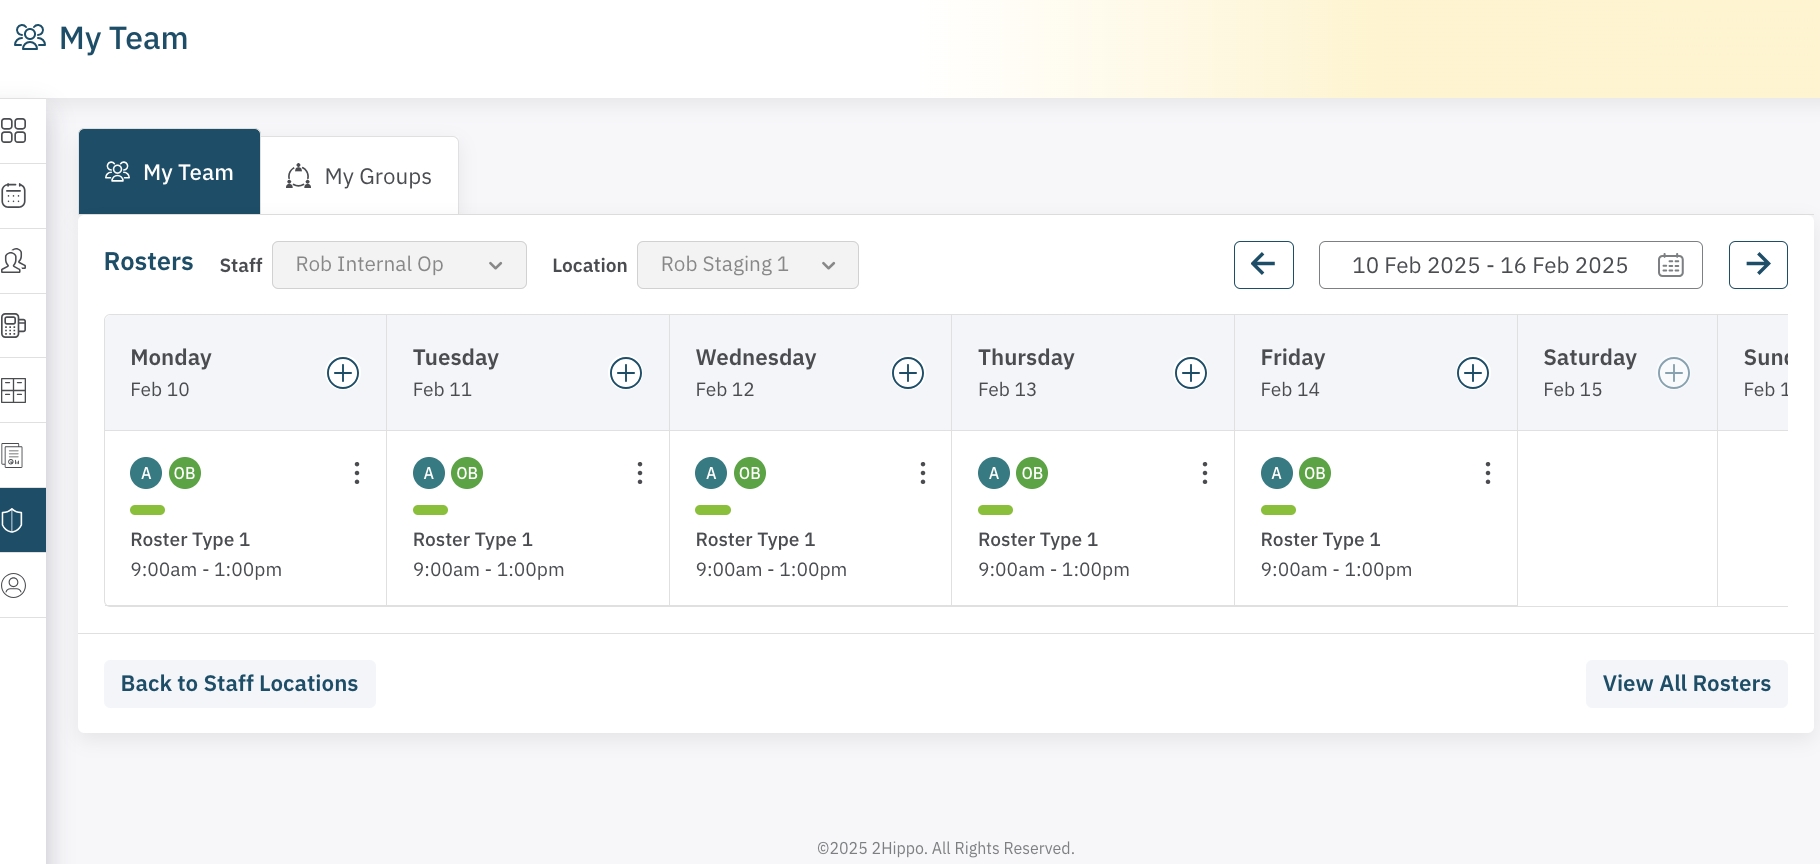
Steps to Roster a Team Member
- Select the correct Team Member from the Staff drop down.
- Select the correct location from the Locations drop down.
- Choose the correct start date for the roster using the date picker.
- Click the + icon on the desired day to roster a team member.
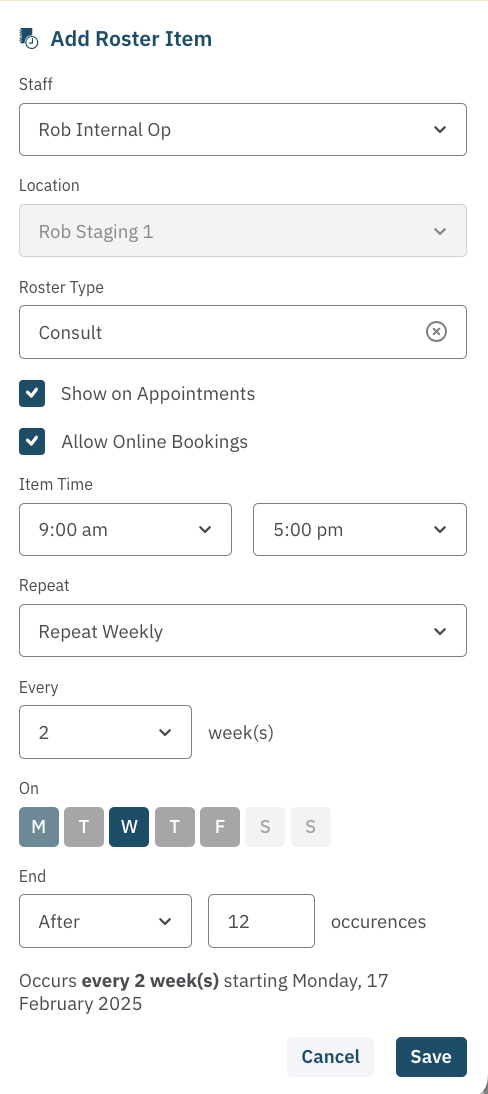
- Enter the necessary details for the Roster Item:
- Location
- Roster Type (Ensure these are set up before rostering)
- 'Show on Appointments' (Tick if you want the item visible in the appointment calendar. Untick if the roster is only for internal use, e.g., for reception staff.)
- 'Allow Online Bookings' (Refer to the article on Booking Deposits)
- Item Date
- Item Times (Ensure correct AM/PM selection)
- Repeat Function
Roster Items vs. Series
- Roster Items: Refers to individual roster entries for specific days.
- Roster Series: Refers to repeating roster entries that form a series.
Repeating Roster Function
Understanding the Repeat Function is crucial to avoid roster conflicts.
Note: Repeat occurrences cannot be edited directly once created; they are overwritten with a new roster item/series as reqired.
- Does Not Repeat: This roster item appears only once (popular for casual rosters).
- Repeat Daily: This roster item is used for casual rosters that may repeat (by selecting repeat every 1 day) or on the selected days (eg. repeat every 2 days). For example, if you wish to roster a nurse to cover Tuesday to Thursday of one week only, you would start the roster on Tuesday and Repeat the roster every 1 day for 3 occurrences (or until the chosen end date).
- Repeat Weekly: This roster item is used for rosters with regular sessions that reoccur each week. The roster item will reoccur on the same day every week (by selecting repeat every 1 week) or on the selected weeks (eg. repeat every 2 weeks). Multiple days can be selected when rostering this item; Selecting Mon and Tue, will repeat these days each week.
- Repeat Monthly: Used for rosters that repeat monthly, either on the same day each month (e.g., every 1 month) or on selected months (e.g., every 2 months).
- Repeat Yearly: Less often required, but useful for scheduling or blocking annual events.
Editing a Roster
To edit a Roster Item or Roster Series, click the three dots in the top right corner of the selected day and choose Edit Item or Edit Series.
Please note that only the times are editable. If you need to make changes to repeat occurrences, replace the current roster with a new one.
Deleting a Roster
To delete a Roster Item or Roster Series, click the three dots in the top right corner of the selected day and choose Delete Item or Delete Series.
A roster can only be deleted if there are no bookings in the roster period. A warning will be shown, and the booking must be dealt with before the roster can be deleted.
Note: This action cannot be undone, so ensure you're certain before applying the changes.
Managing Rostering Conflicts.
To avoid scheduling conflicts for team members across multiple locations, it is recommended to use the roster view feature that shows schedules for all locations at once. This makes it easier to manage schedules and prevent issues with overlapping shifts.
When setting up or adjusting rosters, the system will alert you to any conflicts that may arise. A warning will appear with options for how to resolve the conflict, along with explanations for each choice. It's important to carefully review the warning before proceeding to avoid unintentional changes to current schedules.
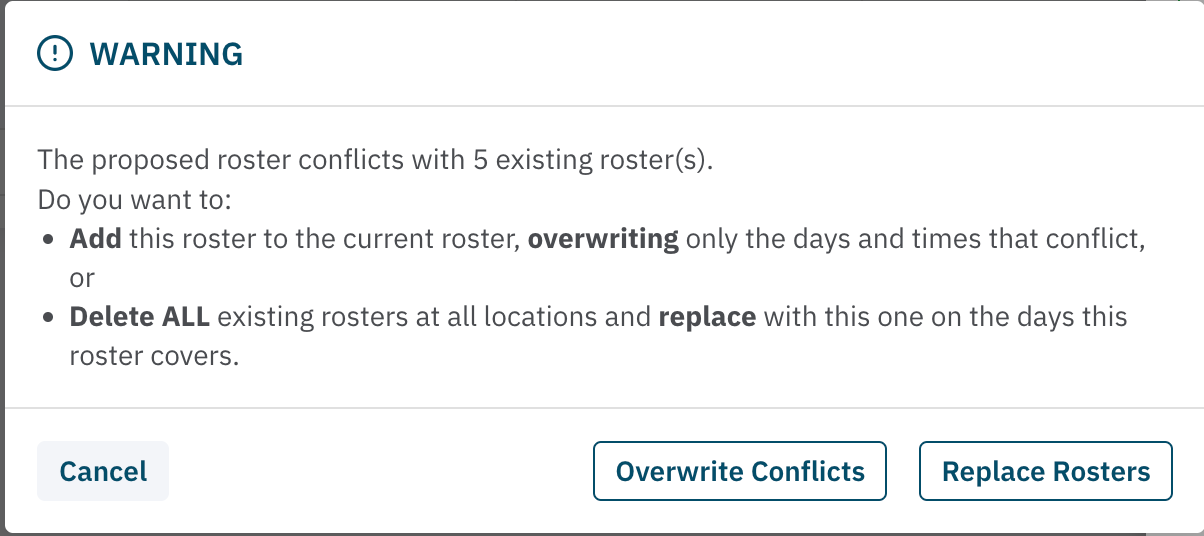
There are two options for resolving conflicts:
Option 1. OVERWRITE CONFLICTS: The existing roster will replace the conflicting days and times on the new roster only.
Scenario: Jill has a roster on Monday to Friday at Location A. Her new roster at Location B requires her to work Friday and Saturday. A new roster is created for Location B, with a conflict warning of the conflicting rosters. In ths case Jill only needs to Add this roster, as Saturday was not scheduled and Friday has a conflict that needs to be changed.
Note: Jill could have removed the Friday roster first and avoided a conflict situation arising.
Option 2. REPLACE ROSTERS: Conflicts at the other rostered locations will result in the conflicing rosters being Deleted and Replaced with the new roster. This action is permanent, so be sure to confirm that you are making the correct choice.
Scenario: Ben has moved to a new city so his shifts will be ending at Location A and he will start a new roster at Location B. His roster is setup for Location B and it warns of conflicts. As Ben does not want to work at Location A he opts to Delete ALL rosters at all conflicting Locations and replave them with his new roster.
Note: Ben could have removed all rosters from Location A first and avoided a conflict situation arising.
Related Topics:
<— PREVIOUS ARTICLE | NEXT ARTICLE—>